
What is the purpose of the Archive scanning profile assigned to Button 0?
Archive setting is a default profile built in the Profile Manager of the 940/960-gt scanners. You may edit or delete the profile at any time via Profile Manager.
How do I access Profile Manager?
To access the Profile Manager in the AmbirScan ADF-gt software, complete the following steps:
- Right-click on the AmbirScan ADF-gt icon located in your System Tray.
- Left-click on Profile Manager
- The Profile Manager window will display.
How do I access the Button Properties in AmbirScan ADF-gt software?
To access the properties dialogue box, complete the following steps:
- Left-click the AmbirScan ADF-gt icon in your System Tray, or double click the icon located on your desktop.
- Right-click on the name of the button you wish to view. Note – you must click on the name, not the number to access the properties.
How/when to use Additional Length Detection?
Additional Length Detection is located on the More Settings tab. can be enabled if you have selected a specific page size in the Paper Size section of the Basic tab. See screenshot below for reference:

Please note Auto Crop & Deskew is the default setting for all button configurations.
If you are using a specific paper size and need to turn on Additional Length Detection, select the box next to the option on the More Settings tab. See screenshot below for reference:
Where are my documents saved? How do I change the save location?
- Double-click on the AmbirScan ADF-gt icon on your desktop or left-click the icon in your system tray.
- Right-click on the name of the button (not the button number).
- The settings window will display for the specified button. In the example below, button #1 is displayed.
- The Directory section is where your image will be sent. See the image below:
- To change the save location, click Browse and select your new location.
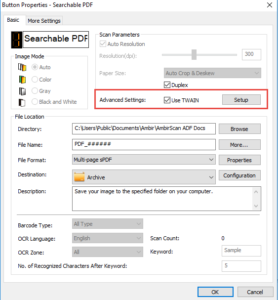
How do I access the TWAIN driver?
The TWAIN driver has several other advanced settings users may choose to access for their scanning needs. The TWAIN driver is accessed via the Basic Tab within the Button Properties section. Check the box next to ‘Use TWAIN’, then click Setup to enter the TWAIN settings menu. See the screenshot below for reference:
How do I adjust my Energy Star power settings?
The default settings for the Energy Star power settings is 15 minutes. This means if the scanner is not in use over 15 minutes, it will enter Sleep Mode.
The power off setting is enabled after 240 minutes (4 hours).
To adjust these settings, complete the following steps:
- Left-click the AmbirScan ADF-gt icon in your System Tray, or double click the icon on located on your desktop.
- Right-click on the name section any of the buttons in the Button Manager software
- Check the box next to Use TWAIN
- Click Setup next to the TWAIN option
- Click on the Setting tab
- Adjust the time settings to your desired specifications.
What are the options for using the scanner with Microsoft Word?
- Button #2 in AmbirScan ADF-gt software is pre-configured to create Microsoft Word documents from a scan.
- Using the nScan to App function, an image file created by a scan (JPEG, BMP, TIF, etc.) will be inserted into your open Word file at the placement of the cursor.
- Using the nScan to App function, an OCR scan will insert editable text into your open Word file at the placement of the cursor.
What are the options for using the scanner with Microsoft Excel?
- Button #9 in AmbirScan ADF-gt software is pre-configured to create Microsoft Excel documents from a scan.
- Using the nScan to App function, an image file created by a scan (JPEG, BMP, TIF, etc.) will be inserted into your open Excel file at the placement of the cursor.
What are the options for using the scanner with Microsoft Power Point?
- Using the nScan to App function, an image file created by a scan (JPEG, BMP, TIF, etc.) will be inserted into your open Power Point file at the placement of the cursor.
What is the purpose/value of using the nScan to App function?
The purpose of the nScan to App function is to send a scanned image to a designated application (ex: Microsoft Word, Power Point, Paint, etc.).